September 2019
Due to the way kits accumulate when you’re not watching them (the same way that wire coat hangers accumulate in your wardrobe) I ended up with three kits of the ancient Airfix 1/144 Airbus A.300B-2. These were not new kits. The first was the original 1974 boxing with Air France decals, another was the 1974 kit in the same box but with a sticker on the front saying ‘Eastern Decals’ and, unsurprisingly, Eastern Airlines decals inside. The third was a reboxing of the Airfix kit in a Skylines Models box that was released sometime in the early 2000s. There are a few minor accuracy problems with this kit but overall it looks like an A.300 and unless you know exactly what you’re looking for there’s nothing to complain about.
Over the years I’d also accumulated decals for Australian versions of the A.300, all by Hawkeye; for the original Trans Australia scheme, the Air Niugini scheme and the later Australian Airlines scheme. Many years earlier I’d made this kit with the Trans Australia decals but I’d made it with the fuselage windows retained and filled with Krystal Kleer and used enamel white paint which had started to go yellow. These days I use fuselage window decals and use white lacquer paint, which has less tendency to go yellow, so I thought it would be nice to start again.
For a kit that was put on the shelves 45 years ago, the two Airfix boxings went together very nicely, for a kit designed back then. The most annoying feature of the kit is that you get the option of having all the cabin and cargo doors open, a truly dumb idea as then you’d have to put something inside as well, and there’s nothing inside to look at. Filling all the holes where the doors go is not simple because if you get the wrong door in the wrong hole they don’t fit properly and a lot of filling and sanding is subsequently involved. I only made that mistake with the first one.
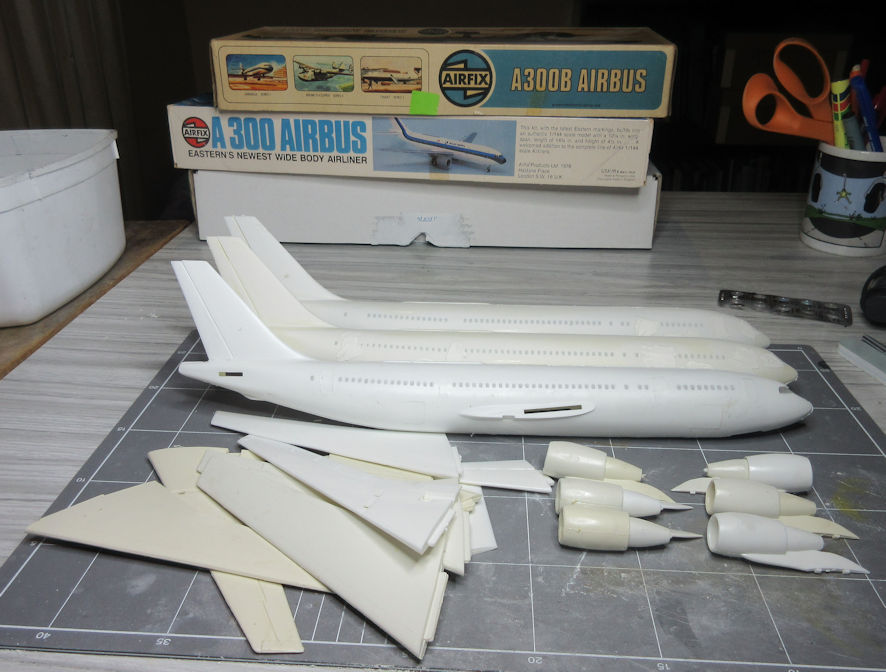
If you don’t have much filler in your house, if you’re going to make this kit now might be the time to go out and get some more. The fit of parts is not what you expect in the 21st Century and there is a lot of shrinkage, particularly in and around the flap tracks. If you like scribing raised panel lines this is the kit for you, everything apart from some of the flap details under the wings is raised and a REAL modeller would sand them back and rescribe the entire model. Knock yourself out, it was too much like tedious work for me.
After the two Airfix kits I turned to the Skylines reboxing which, you would think, being at least 25 years younger, would have been better. Not so, the fuselage in particular was very badly warped and only made useable with all the techniques available to the hardened modeller, and the liberal application of harsh language, before it gave in to my ministrations.
Getting the model to the painting stage takes some effort and probably three or four attempts with a primer coat to find all the flaws before it is as close to perfect as I’m ever going to get. Most experts these days recommend using a black primer which, so they say, reveals all the flaws before painting. I tried it once and I reckon they are wrong. If you’re going to be making a model that is basically light grey, white and metallic, near enough is not good enough and nothing reveals flaws better than a brisk coat of a metallic lacquer before committing to the paint job for the model.
Before beginning to put paint on plastic I thought it might be a good idea to do a little research about the airliner I was about to make. Back at the beginning of the 1980s TAA, as it was then known, ordered five Airbus A.300B-4s which would meet forecast passenger demand for quite a few years to come. By the standards of the times it was a big aeroplane, a wide bodies domestic twin aisle airliner with a passenger capacity of around 250. As it turned out, there was a serious downturn in the domestic passenger market around the time that the first of TAA’s A.300s arrived and the slightly smaller Boeing 767s that Ansett ordered, with a passenger capacity of about 200, fitted better into the market at the time. The result was that TAA had these airliners that were too big for the market and so it deferred a couple and leased out one to other airlines until the market picked up again.
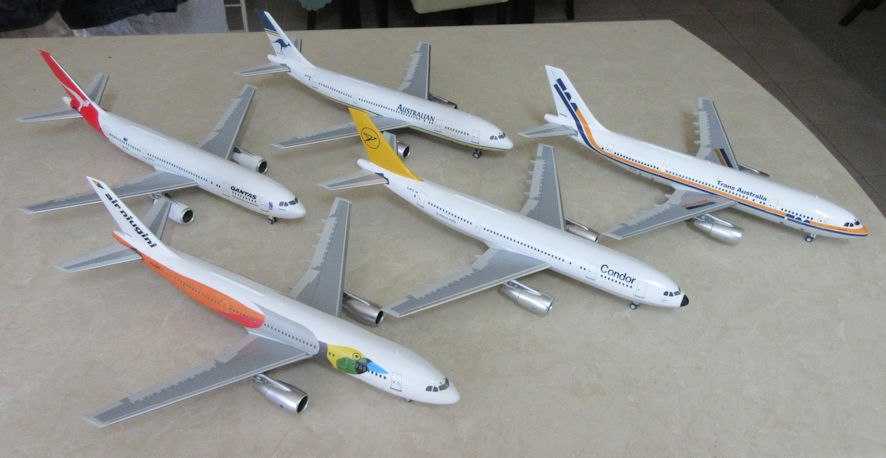
The first of TAA’s A.300s was VH-TAA which was the one the airline leased out, first to a European carrier and then to Air Niugini which flew it for most of the rest of the 1980s. After that it came back to TAA which had by that time been rebranded Australian Airlines and then it went to Qantas when the government sold Australian to Qantas. After that it was sold to an airfreight company overseas and ended up being broken up at Abu Dhabi. So, with the kits and decals I had I could tell part of that story.
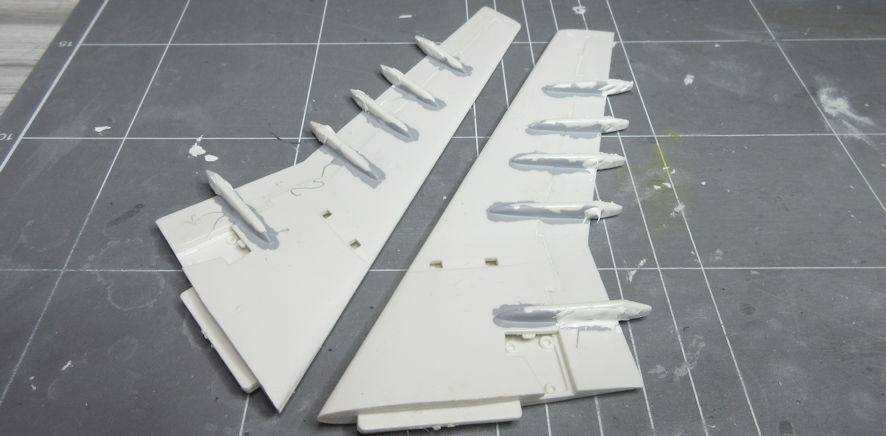
The wings on all the A.300s were the same, painted Airbus grey (an automotive lacquer that had been made for me by Darby’s) with bare metal leading edges that I tried to simulate using Tamiya TS-83 rattle can lacquer. The corogard panels were provided by the Liveries Unlimited decal sheet, now long out of print but which I’d bought earlier and put aside for a rainy day.
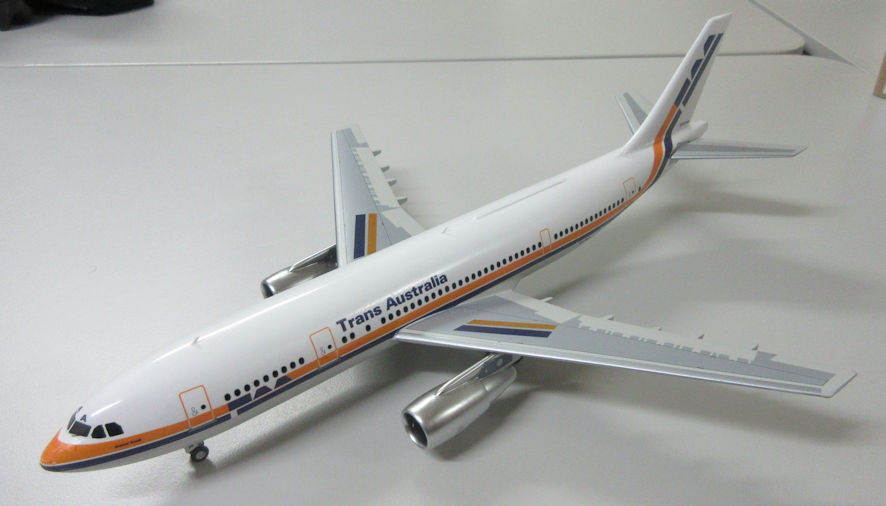
The decals were more fun. The original TAA version of VH-TAA had a grey and white fuselage with the grey coming up to where the airline’s livery stripes were painted. Finding exactly where that line had to be so that the decals went into the right place is a technique it would take too long to describe here. While doing this I discovered that there is a serious error with the decal sheet, the cabin windows for about the final third of A.300 the cabin slope up gently (which you will also see if you look at any of the Qantas A.330s you see at airports these days) but the decal sheet does not depict this. I gave a lot of thought to working out how to rectify this problem and came to the conclusion that it could only be done by painting the fuselage bands and cutting up the decal sheet, and I wasn’t feeling that brave. I reckoned that nobody would notice if I didn’t tell about it, Oppps…
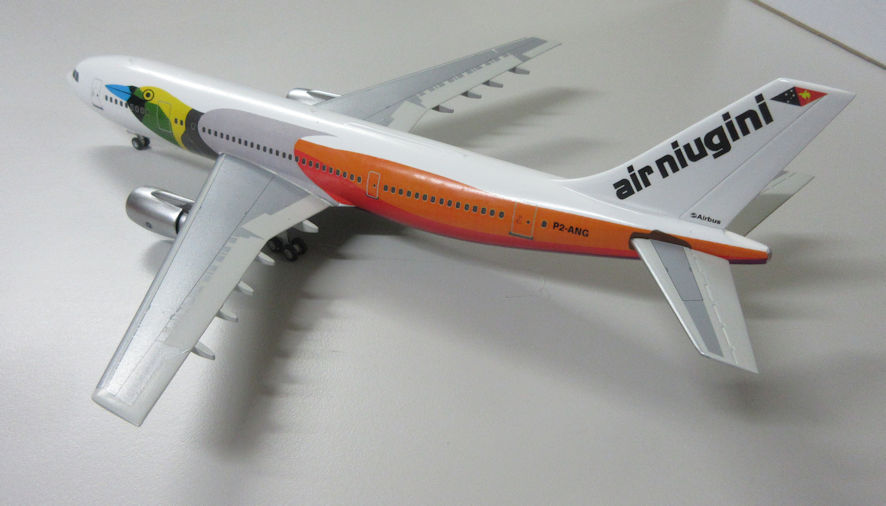
Talking about brave, the Hawkeye decals for VH-TAA when it flew for Air Niugini are a very large sheet of very large decals for the Bird of Paradise scheme. After thinking about this for some time and looking on the interweb to see what others I had done, I decided the best solution was the cut the decals into sections and apply them separately. Much to my pleased surprise, this system worked well and the final result was much better than I had expected.
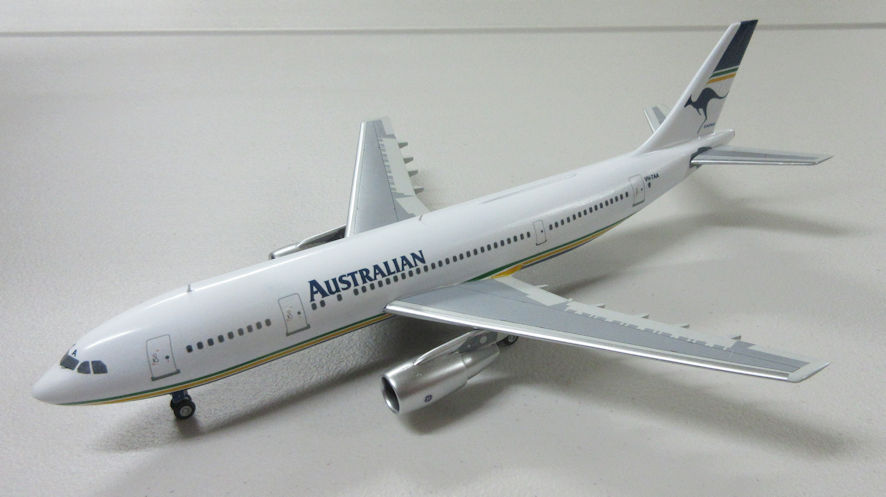
After the first two schemes, the Australian Airlines decal sheet was a walk in the park.
Having completed those three models I sat back and congratulated myself. But then a thought popped into my head, the story of VH-TAA as told by those models was not complete. What if …? I went to the Hawkeye web site and saw that it offered decals for that airliner in Qantas livery. Next I had to find another Airfix 1/144 kit, which I found on ebay for less than I had probably thought it would cost. After the usual application of glue, filler and paint I then had four versions of VH-TAA telling the story of its history from the early 1970s until it went off the Australian register in the mid 1990s.

But wait, my brain said, there’s a gap of about six months you haven’t filled. A little research told me that before it went to Air Niugini, VH-TAA flew with the German airline Condor (a subsidiary of Lufthansa apparently), registered as D-AITA. I found some photos of it on the interweb and thought, What if …? I hunted on the internet and found that there were decals for Condor A.300s, not for D-AITA but that would be easy enough to solve. All I had to do then was order the decals and find another Airfix 1/144 A.300 kit, this time for a bit more than I would have liked to pay for it.
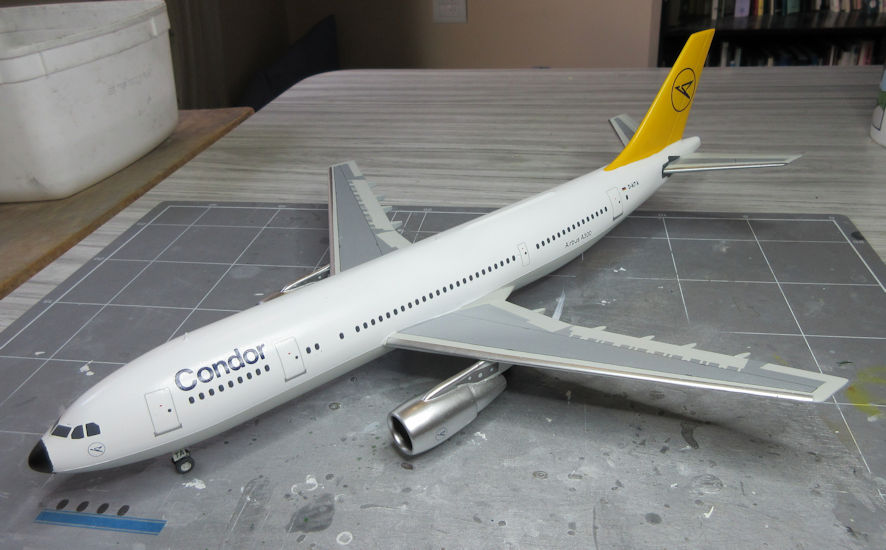
When they arrived I found that the Condor decals did not include windows and doors, so I had to order them from overseas and, fortunately, another set of Liveries Unlimited corogard decals that I managed to find in a dusty corner of the interweb. All was set to finally complete telling the story of VH-TAA in model form, except for one problem. The Condor decals were made by Flightpath, an Australian company which seems to have disappeared long since. I’ve come across them before, they are either very old or badly made because they have a tendency to blow apart when you just touch them. To stop this happening this time I applied a lavish coat of varnish to hold the together, but one coat wasn’t enough. Fortunately, the overseas supplier had another set and when they arrived I gave them two lavish coats of varnish and, between the two sets, I managed to finally finish the Condor version of VH-TAA.
Of course that is not the full story. After it left the Australian register if continued flying. But a modeller has to draw the line somewhere or go nuts.
Leigh Edmonds little box of stuff
Writing history – making scale models – other stuff
