(May 2003)
When the United States Air Force was developing its long range strike force of nuclear bombers capable of reaching Russia it was able to reduce the fuel capacity of those bombers (and thus their size, cost and vulnerability) by using the new technique of air-to-air refuelling that had been pioneered in Britain. The basis of this airborne tanker force was the Boeing Model 367-80, a swept wing four engined transport that went on to form the basis of the civil 707 and the military C-135. The Model 367-80 first flew on 15 July 1954 and was then fitted with the Boeing designed ‘flying boom’ that would be used to refuel other aeroplanes. In September 1955 Boeing received the first order for KC-135A tankers and the first one flew on 31 August 1956. The KC-135A entered service with the United States Air Force on 28 June 1957 and the final tanker was delivered in 1965. A total of 732 KC-135s were delivered and another 88 C-135s were built in over 30 different models for the USAF such as cargo transports, flying command posts and electronic reconnaissance aircraft.
By the end of the 1970s studies were underway to replace the noisy, smokey and inefficient J57 engines of the KC-135As with more efficient ones. Two programs resulted, one for the Air National Guard and Air Force Reserve to upgrade over 160 KC-135As with TF-33-PW engines taken from used commercial 707 airliners, the resulting aeroplanes being redesignated KC-135Es. In 1980 Boeing announced more ambitious plans for a major upgrade program involving refitting KC-135s with CFM56 high bypass-ratio turbofan engines to offer far greater fuel efficiency, noise reduction and operational flexibility over the original KC-135s and the KC-135Es. They were also fitted with an additional auxiliary power unit to allow them to operate from austere locations. The first delivery took place in July 1984 and in all about 432 KC-135As were re-engined and redesignated KC-135R. This new version could offload 50 per cent more fuel, was 25 per cent more fuel efficient, cost 25 per cent less to operate and was 96 per cent quieter than the KC-135A. The KC-135R is now the mainstay of the United States Air Force tanker fleet and flies with other air forces including those of Singapore and France. Forty-five KC-135Rs are also being fitted to accept wingtip hose-and-drogue air refuelling pods to allow them to refuel US Navy and NATO aeroplanes fitted with probe refuelling equipment. They will remain in service well into the 21st century.
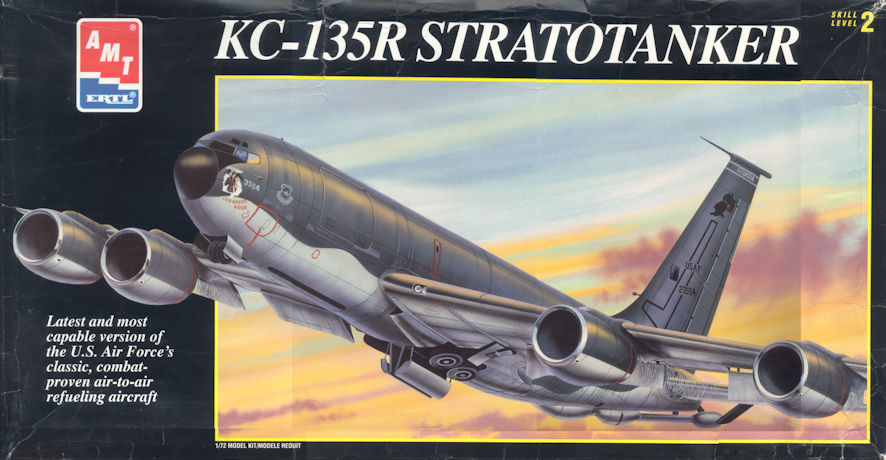
I hadn’t given much thought to making a model of the rather utilitarian KC-135 but when I saw pictures of the KC-135R with the old 1950s airframe and those huge modern high by-pass engines hanging under the wings I gave in to temptation. What an amazing looking bit of machinery, almost like an old Wren (if you are old enough to remember him) caricature of a KC-135. This temptation was helped by the AMT kit of the C-135 that comes in a number of guises, all based around some standard sprues but with extra bits thrown in for each different version.
This kit isn’t much different from several AMT kits from the period when that company turned out a lot of big kits – the XB-70, the XB-46, the B-52, the AC-130H and several more; basically very nice kits with a few gaping holes that require seemingly gallons of filler and lots of very nicely done interior detail that you never see. (Perhaps they provide all that interior detail because they want modellers think they are getting value for their money because these kits are big but there isn’t much scope for the exterior detail that livens up most smaller models. This is probably a good argument for somebody doing these models in 1/144 kits.)
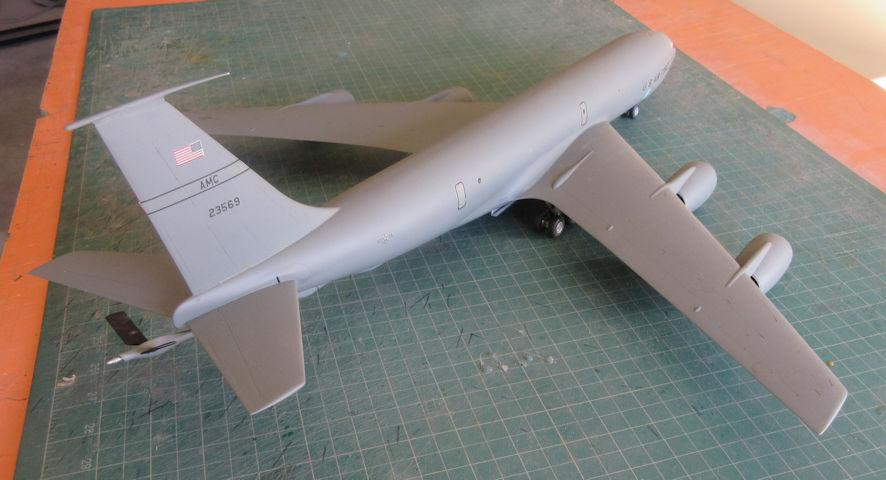
Construction is more or less straight forward. The plastic of the mouldings is fairly thin and this presents problems when it comes to joining them up because they are not sturdy enough for such a large kit so they tend to bend and bow a little, often making it difficult to get edges to align properly – the most prominent place where this happens is the otherwise excellent wing structure that goes together to give the wings the correct dihedral but just wouldn’t line up properly for me. Consequently the not-quite-flush surfaces had to be sorted out with lots of filler to improve those surfaces. Had I paid more attention to getting this problem sorted out at an early stage I might have saved myself more trouble down the track.
You could really leave out all the interior detail except the pilot’s seats, the rest is invisible but I put in it anyhow. There were, for me, two major difficulties with this kit. The first is that when it came time to join the lovely huge engine nacelles to the wings they had a very distinct and unrealistic downward inclination that I could only fix by building up the rear of the pylons – 1mm for the inner pylons and around 2 mm for the outer ones – to give them a more realistic appearance matching that of the reference photos. (I can’t say whether this problem exists for versions having older engines.)
The other problem came with the undercarriage which didn’t quite seem to line up properly (I wonder if this problem came from the difficulty I had lining up the wings properly) and looked terrible when it came time to fit the wheels. The main undercarriage bogies sat at an angle so the nose wheels wouldn’t touch the ground and one wing tip was 5mm higher than the other. The only solution was to cut the main bogies off the undercarriage legs and then put a little extension on one leg so the wings were level and the nose wheel sat on the ground too, gluing everything back together with 5-minute epoxy. All this was achieved with ingenuity, patience and a lot of bad language (who said this hobby is relaxing?), but the end result looks a lot better than it would have been without the additional effort.
I gave some thought to finishing the model in French colours but couldn’t find enough information to do it properly. The kit offers two options and I took the simpler all over grey version. The instructions recommend a dark grey that was a bit too dark for my tastes so I used good old Dark Gull Grey. I couldn’t decide from my references whether or not the polished bare metal leading edges of the engine pods extended back to the fans and took the easy way out. The end result isn’t too bad looking at all, but a bit plain. What else would you expect.