(February 2014)
One thing is for sure, the Convair B-58 looked like it was doing mach 2 when it was just sitting on the tarmac. It was one of those aeroplanes that looked just perfect for the job it was designed to do, to deliver atomic weapons into the USSR at high altitude and high speed. I thought it was a fabulous looking aeroplane from the first time I saw a photo of it and now that we have things like youtube I enjoy looking at movies of it hurtling down the runway with four afterburners going, and shooting up like a rocket.
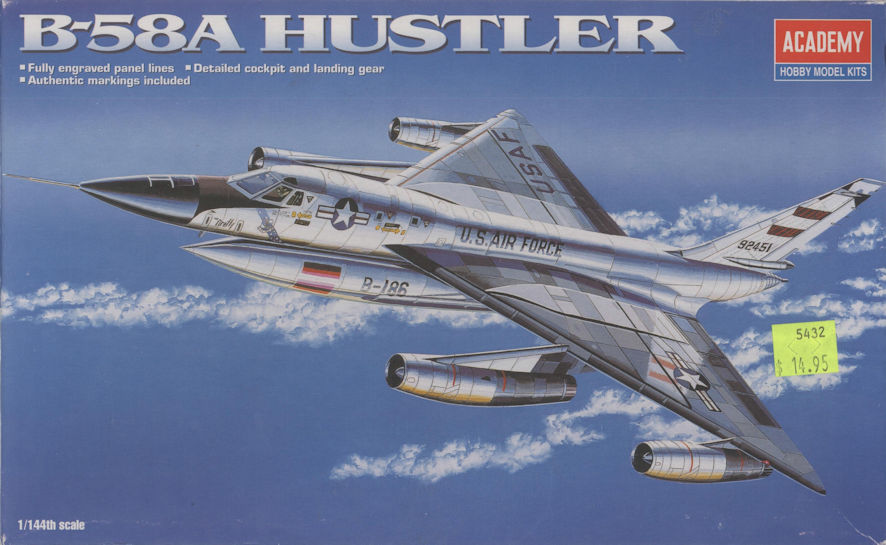
Somewhere in my Treasure I have the Italeri 1/72 kit of this aeroplane that I may get around to making one of these days. Decades ago I made an odd scale Lindgerg kit which, despite my fumbling and painting the entire thing Humbrol 11, still looked nice. More recently, with my interest in airliners – which means making models in 1/144 – I picked up the Hobbycraft 1/144 kit of the B-58 so that, when I made it, I would have a model of this magnificent looking aeroplane in scale with many other big aeroplanes.
The first thing you notice when you open the kit box is that the B-58 is not a big aeroplane. There were so many tiny little pieces of not-quite-properly formed plastic that I put the lid back on and took a deep breath before looking again. Some Mach 2 kits look more promising, at first glance anyhow.
Sorry, I got distracted there for a moment. I was going to tell you that the reason the B-58 looks the way it is is because it was designed in the 1950s when aeronautical engineers were still trying to figure out the complexities of high performance flight while trying to make functioning and useful aeroplanes. You can tell the B-58 was designed and made by Convair simply by looking at the wing platform which is the same thing that you see on Convair’s F-102 and F-106 and its YF2Y flying boat fighter. The delta wing seemed to be a good solution of making aeroplanes that fly fast. The British had the same idea with the Avro Vulcan but they buried the engines in the wing while the Americans liked to put their jet engines in pods, and so it was with the B-58.
In many ways the Vulcan and the B-58 came out of the same need to make a bomber that could penetrate Russian airspace and drop atomic bombs on Russian cities. Both designs had their roots in studies originating in the 1940s but, while the British were more conservative and went for a relatively simple aeroplane that could do the job at subsonic speed, the Americans wanted the best that their technology could make with all the complexity that involved. The ultimate result was that Vulcans went into service a little before B-58s but remained in service long after all but a few museum examples of the B-58 had been scrapped.
The B-58 suffered from many problems. For example, it cost a fortune to develop and build and maintaining it required all sorts of specialized equipment and personnel. (I recall reading somewhere that they were literally worth their weight in gold, but the price of gold then is not what it has now become.) It was difficult to fly although their crews came to love the aeroplane once they had got used to it. It faced two main problems, however. One was that it came into operations at about the same time that the Russians started deploying their SA-2 (Guideline) anti-aircraft missiles. The B-58 was supposed to fly higher and faster than Russian fighters to safely deliver its weapons but the SA-2 put an end to those plans. As a result the B-58 was given the new task of low-level penetration but, at about 500 feet, it could not fly at supersonic speeds and its range was severely limited. Eventually that rolw was taken by the FB-111A which was much better fitted to that role. The other problem was Robert McNamara, the United States Secretary for Defence who did not approve of the B-58. Of course McNamara is known for having all kinds of strange ideas, such as the F-111B, so it is hard to say whether or not he was right about the B-58. It may also be that the general public was starting to get sick and tired of all those sonic booms as the B-58s went about their training programs. In any event, the US Air Force tried to fight McNamara but lost, and the B-58s were all withdrawn from service by January 1970 after a front line service of only ten years.
While they were in service B-58s did some spectacular things and set some amazing records. Some have been overtaken by later aeroplanes such as the SR-71 and others have not. A B-58 still holds the record for the fastest flight between Tokyo and London at an average speed of 938mph. Another B-58 set the record for the fastest flight between New York and Paris in May 1961, covering the distance of 3,833 miles in a few seconds under three hours and 40 minutes at an average speed of 1,048.68 miles per hour.
Enough for idle musing, let’s lift the lid again on the Hobbycraft 1/144 kit of the B-58. Doing some research is not going to make the kit any easier to turn into a reasonable (or acceptable at least) model, so why bother. I gather, from seeing different box tops, that the kit is available in several versions though I can only imagine that the decals might be different but the plastic is the same. There are several sprues of reasonably well moulded plastic in a cellophane bag, a small decal sheet and one of those instruction sheets that makes you wonder if Hobbycraft – a Canadian company so I understand – has its base is Quebec where they speak French and probably do other things in the French style, including post-modern instruction sheets though, it must be admitted, less post-modern than some Hobbycraft kits I’ve dealt with. (I’m still having bad dreams about their Dash-8.) The main thing is that since the B-58 was not a large aeroplane this kit contains lots of tiny plastic pieces. Offering up a prayer to the god of modelling (which of those Greek gods was responsible for scale modelling I wonder) I take my sanity in my hands and dive in. This is one of those kits that you just know isn’t going to be a barrel of laughs and makes you wonder why you make scale models in the first place.
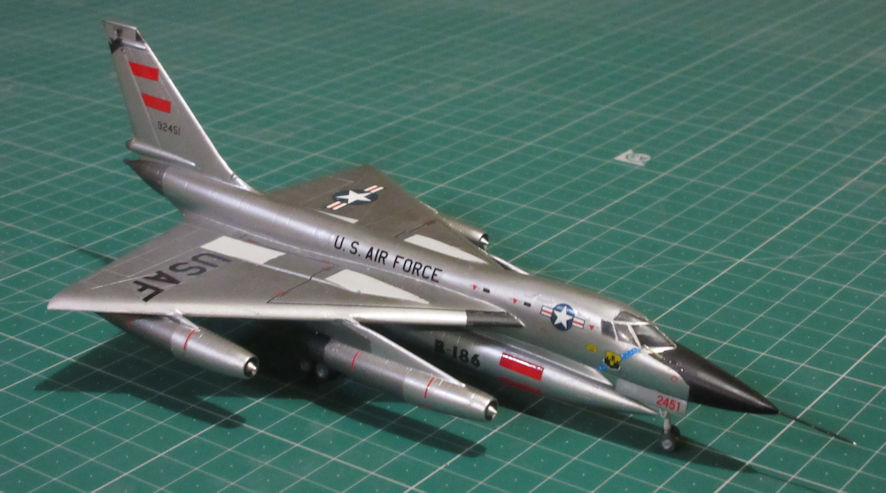
Let me single out only three of the challenges in making this model. The cockpits, the wings and the wheels. (I could probably think of more things that didn’t please me but you don’t want to read me whinging all day, do you?) A fourth challenge is the business of finishing the model so it looks something like an operational B-58, but let’s put that off as long as we can.
The cockpit canopies are clear, all three of them. This is strange since the second and third crewmen sat in darkness with only tiny windows at each side for them to peer out of. This is not really an issue but what is is the way that they don’t fit. You get the option of making the model with the canopies closed or open and there are little seats and decals for the instrument panels so it might well have been easier to make the model with those little cockpits open. That, however, would not have captured the look of the B-58 that I wanted to represent. After muttering to myself about this for some time I ended up painting the cockpit interiors black (called Plan B you will recall) and I then glues the pieces in place with thick superglue which dries clear, and is better than having a hole where a window should be. After I’d worked this mess into a reasonable semblance of what a B-58 forward fuselage should look like I sprayed on a coat of Tamiya primer, looked at the results, sighed and applied some filler in all the holes and where the shape was not right, waited, sanded it back to an improved shape, sprayed on more primer, sighed, applied more filler, etc, etc. All this was made more complex by the need to protect the clarity of the front cockpit windows. If I had thought about it I would not have worried about that and, when the right shape had finally been achieved, either painted the windows gloss black and then masked them in the way one can for airliners or cut pieces of black decal to the shapes necessary to represent those windows. As it was, all this struggle to get the forward fuselage looking reasonably accurate ended up with the model sitting on the shelf for a few months before I got up the courage to go on with the project.
Next, the wings. I found a construction review of this kit somewhere on the interweb where the builder went to immense effort to sort out the problem of slight sink marks on the upper wing by fabricating new upper wing undercarriage farings, sanding off the existing fairings and replacing them with the scratch built ones. I peered at my kit and could see that there was perhaps something to what he saw, but only if you looked really hard. What was blinding obvious, to me at any rate but not to other reviewers I’ve read, is the BIG problem with the wing profile. The leading edge of the kit wings is grotesquely thick and completely unlike the thin wings on the real thing. This might have been a relatively easy thing to fix except that sanding the wings to the right profile would have caused problems when it came to attaching the engine pylons and would have destroyed those upper wing undercarriage farings. I could perhaps have done the right thing and sanded the wings to the correct profile (I know you would have) but I was starting to get frustrated with this kit and didn’t want to go through all the fuss that I’d suffered with the forward fuselage. So I compromised by sanding back the leading edges as much as possible without compromising the pylon attachment points of the upper wing farings. The result is not ideal but it looks much better than the grotesque shape offered by Hobbycraft.
Finally the wheels. Not that there was anything wrong with them except that the wheels were tiny and there were a lot of them. Because the B-58s wings were so thin the wheels had to be tiny, and even then the wings had special farings so that the undercarriage could fit (see above). There are eight tiny wheels on each main undercarriage truck with wheels doubled up as you might see on big trucks and semi-trailers. Usually I don’t mind having big fat fingers but when it comes to handling tiny wheels to glue them together and paint them, my frustration is without end. If I had been very brave I might have handled these small parts with tweezers, but I’ve had too much experience with little pieces shooting out of my tweezers to the far corners of my room and into the carpet and never being seen again. So I had to use my big fat fingers … Grrr.
Eventually, finally and in the end, this model was to the stage where it needed painting. There is only one option with B-58s, bare metal. This is not as frightening for me as it might have been a decade ago, but it’s still not fun. There were rumours that some B-58s had been painted in SE Asian camouflage, which would have been interesting and saved much hassle, but there is no evidence that this really happened … sadly.
The first stage in getting a decent all metal finish is in trying to see what the real thing looked like and that meant me spend a lot of time looking at as many photos as I could find on the interweb. Having done this I came to the conclusion that there was much less variation in tone on the B-58s skin than the kit instructions and most reviewers suggested. This might have been because the skin was a special aluminium sandwich arrangement that may have been used over the entire airframe. The only obvious variations were the rear fuselage and the rear engine pods that were a darker shade. There was also the black parts on the aeroplane such as the radome and the anti-dazzle panel and various other bits and pieces, but there seemed a fair variety on what appeared or did not appear on an individual aeroplane.
From reading the various B-58 construction reviews I gather that every modeller has their own way of achieving a finish that represents bare-metal in their eyes. None of them do what I do so I may as well give you my ‘secret’. First, a coat of Tamiya rattle-can grey primer to make a final check of any blemishes because the surface has to be flawless. When, and if, that is achieved another coat of primer which I polish up with about 6000 grit micromesh. Next a coat or two of Tamiya rattle-can TS-83 Metallic Silver. (The little label on the can suggests that this should be sprayed over Tamiya TS-14 black but the result looks far too bright for me, which is why I use the grey.) I then polish this up with some 8000 grit micromesh and then apply about four coats of Alclad II Airframe Aluminium, stopping after the second coat for another polish with micromesh, this time 12000 grit. That might sound somewhat unnecessarily painstaking but it looks pretty good to me and gives a durable finish that handles well and hardly notices any masking, usually.
Next came the process of masking all the areas that were not to remain that tone; the other metallic shades, the grey, and the blacks. This process took over a day, I use very fine .4mm masking tape because using anything wider around curves in 1/144 invites paint to seep under the tape at the curves. After that I applied Humbrol Maskol on the side of the tape that protected the aluminium finish, a painstaking process that is necessary because there is not much tackworthiness in .4mm masking tape and so that if any paint gets under the tape it only gets .4mm. Usually I only apply a few millimeters of Maskol but on this occasion, and remembering the odd occasion when masking tape has pulled up my bare metal finish, I coated the entire surface that was to remain aluminum bare metal in Maskol, just in case. After that more masking tape because there are always little areas where the Maskol is too thin. Then on went the other colours: grey (my special blend of Airbus Grey), Alclad II Aluminium, Alclad II Magnesium, matt black and then, finally semi-gloss black, masking the completed area before applying the next coat.
After all that the model is swathed in masking tape and Maskol, looking more like a little mummy than a model aeroplane. Unmasking everything is perhaps the most nerve wracking part of the entire modelling process. Has each coat of paint survived being masked? Has there been any bleed-through of paint from one colour to the next? Has the base coat survived too? Fortunately there was little damage done, this time. I breath a great sigh of relief.
Finally, on with the decals. One of the reviews mentioned that the kit decals did not conform to the surface curves of the model, did not respond well to Micro-sol and did not stick very well. One solution might have been to use after-market decals, but there aren’t any. The other solution to this problem is to use a little Selleys Aquadhere mixed into water used as a wetting agent when applying the decals. Some of the glue stays underneath the decals and glues them to the model, but with a bare metal finish it was important to soak up all the residual wetting agent and then wash around the area with straight water so as not to blemish the metallic finish too much. I tend to think that a little blemishing of the finish helps to make the metal look a bit more realistic, that’s my story anyhow.
Applying the decals was, like the rest of the model, hardly a barrel of laughs. Like the wheels, many of the decals were tiny and I don’t know if a two line stencil rendered in 1/144 scale adds much to the final appearance of the model. Still, I’d got that far and I wasn’t going to give up, so I applied them all religiously.
On with the undercarriage doors and the whole thing is finished and behind me. Thank god! Am I glad that I’ve made it? Yes! Would I do it again? Hell no! Does it look okay? Yes, if you don’t look too closely (but that’s not the point of 1/144 models anyhow).
Tell you what. I’m slowly working my way through the USAF bombers and a 1/144 B-52 is on the works program. Many years ago, in the late 1970s I think, I bought the Crown model of the B-52H which was, for its time, a very good kit. I recently pulled it out of my Treasure and looked at it, thought about all the work that would go into a bare metal finish and almost fainted. This led me to buy the new Minicraft B-52H which has that dark grey finish and promised to be a much simpler painting project. I opened the box and inside is the old Crown kit with a couple of additional bits to make the updated B-52H with the longer tail. Everything else from the Crown kit is included including the old Sky Bolt missiles. Now, looking at the completed B-58 model, I’m starting to think that I might make the old Crown kit rather than the ‘new’ Minicraft kit. It would sure look prettier than a big grey aeroplane.
Maybe I’ll make the B-52 in all its bare-metal glory or maybe I’ll take my medication, come to my senses and make the modern grey model. Perhaps I need to wait a year or two until I forget the painful process and only have the end result to look upon. Time will tell.