(June 2020)
Earlier this year I completed 1/144 scale models of some Fokker jet airliners, F-28s and Revell kits of the Fokker 100. At the end of that item I mentioned the shorter version of the Fokker 100, the Fokker 70, and that Alliance Airlines seemed to be the only airline in Australia flying it. I then mused on whether or not I’d be able to make a model of that airliner since I would need another Fokker 100 kit to convert and some Alliance decals for it. You might say that since then my fortunes have changed and I’ve now made a model of the Alliance Fokker 70.
This project became possible while I was perusing Ric Warcup’s list of the decals he has made and noticed that he has decals for the Alliance Fokker 100. I sent him a message saying that I’d like a set to use in making an Alliance Fokker 70 and he obliged, throwing in registrations for an Alliance Fokker 70 as a bonus.
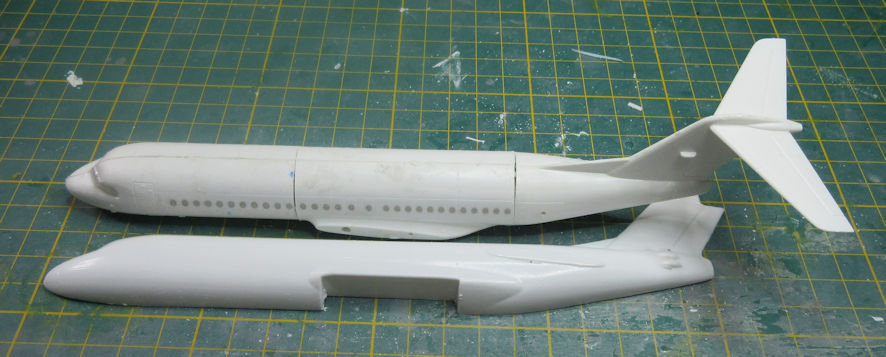
Making a Fokker 70 out of a Fokker 100 should be simplicity itself, just remove plugs from the fuselage fore and aft of the wings. If you are fussy you might also source slightly different engines to replace the kit engines, though only a purist would notice the difference. You know me however, if there is an easy or a difficult way to do something I will find the more challenging way.
I blame all the following problems on the fact that I had bought the Welsh Models conversion kit for the Fokker 70 and that set me on the wrong path. Looking at the Welsh Models fuselage halves it soon became evident that this kit was designed to convert the Welsh Models Fokker 100 kit, not the Revell one. The simple solution was to simply use the length of the Welsh Models fuselage halves to show me where to make the cuts to reduce the length of the Revell kit, which is a fairly routine process. Some people recommend making the cuts for the fuselage plugs on the fuselage halves before gluing them together and then gluing the resulting parts together, but my experience has been to glue the fuselage halves together and, when they have set, mark where the cuts are to be made with masking tape and then make the cuts. If I am patient and work slowly the resulting cuts are nice, clean and square, if I rush the result is otherwise.
Working slowly and patiently the necessary cuts were made and the resulting fuselage sections went together nicely. Put alongside the Welsh Models fuselage halves the result was exactly as it should have been. Then I did what I should have done at the beginning, which is to count windows.
We modellers should always be guided by the evidence of what the item we are modelling looks like, and so it is with airliners. Many versions of airliners are defined by their length with means the number of passengers they carry and the number of windows they have. For the Fokker 70 I found some good photo of Alliance Fokker 70s and counted the number of windows on each side (they are often not the same). For this airliners the count is six windows behind the over-wing escape window and fifteen in front. I then scanned the Ric Warcup decal sheet for the Alliance Fokker 100, did a bit of editing and produced an image of what the windows on the Alliance Fokker 70 should be. Then I printed that out and held it against my model. Quelle Horreur!! The model fuselage halves seemed about a centimeter longer than they should be if the decals were to look accurate. (I’ve since discovered that a slightly wider gap between the windows on the decals for the Welsh Models conversion kit mean that they fit very nicely on that kit, but using them would have been difficult because the airline livery was printed on the same decal as the windows.)
Approaching the problem scientifically with a ruler and calculator I found that the Welsh Models Fokker 70 – and therefore my model – is a bit over scale and therefore needed more cut out of it to make an airliner to the right scale length. I measured the additional cuts and started to make them, which were this time neither slow or careful, but when I came to the necessary cut for the forward fuselage I found myself trying to cut through the lead weight I’d put there to keep the nose on the ground. Annoyed and frustrated I hurled the lot in the rubbish bin. Fade to black.
Some time later I found another Revell kit of the Fokker 100 on ebay, and in Australia too so the postage would not be outrageous. When it came time to mark and make the cuts this time I measured carefully using nothing more accurate than the number of windows in the kit, six after the escape window over the wing and fifteen before, which is not quite so simple because the Fokker 100 has two escape windows and the Fokker 70 has one, so that was another problem to resolve.
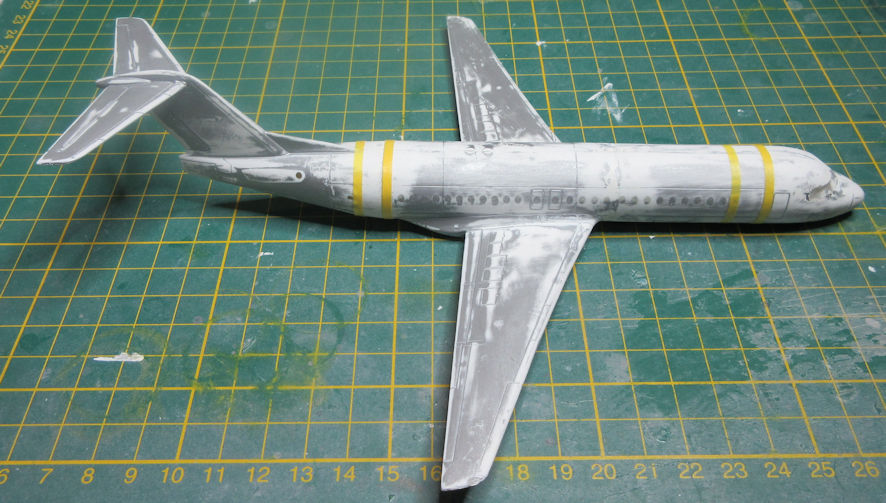
This time I was not so patient or careful in making the cuts so the joints of the remaining fuselage sections was not so easy to line up, but with a lot of jiggling I finally got the nose and the wing sections lined up perfectly. Only then did I notice, Quelle Horreur!, that I’d glued the center section on to the nose the wrong way around. I’ve never seen a Fokker 70 with forward swept wings and I don’t suppose you have either.
Everything went back in the box while I regained my equilibrium and I was ready to approach the problem a few days later, razor saw in hand. It is easy enough to butt join the nose and center sections together because they have the same cross section, but cutting in the same place twice did not result in a nice smooth joint, so there was plenty of filling and sanding before the end result looked reasonable. The cross sections between the center and the tail section have little in common so I used some quick setting epoxy putty to make a plug to hold the two parts together, give the joint strength and back up the part of the bottom central section that was sanded away in merging the two parts. The end result worked out better than I had hoped.
I’d saved the resin engines from the Welsh Models conversion kit and they took to the modified Revell kit much better than I expected. There are, however, two problems with the Revell kit that really annoy me. One is that the flap tracks at the rear of the wings are moulded as separate items and the very slight indications of where they should go disappear in the slight cleaning up that is required to make the wings look presentable. You have to get them in exactly the right position because there are indentations in the wing walk lines where the flap tracks go, and if you don’t get that right the tracks and the decals don’t line up when you try to apply the decals. This has annoyed me with previous Fokker 100 models but I had a brain wave here which did not quite work as I had hoped. The walk lines on the Ric Warcup decals are for the Fokker 100 and those for the Welsh Models Fokker 70 are therefore more appropriate – remember that the Fokker 70 has only one over-wing escape window. So I scanned the Welsh Models decals, printed them on paper and carefully cut them out to use as a template when attaching the flap tracks. This worked out okay for the flap tracks but I used some SMS Extra Thin Cement to glue them in place and, of course, it also ran under the paper templates, gluing them to the wings as well. Quelle Horreur encore!
The thing that I really don’t like about this Revell kit is the undercarriage. While it might be to scale it is also extremely fragile. Knowing this I took as many precautions as I could and only attached them when I could delay doing so no longer. Even so, the nose wheel and one of the main wheels broke off. I replaced the nose leg with something more sturdy that is not to scale, but you’re not going to notice it, and I still had the undercarriage parts from the earlier Fokker 100 I’d thrown in the bin. But if I were to make another Fokker 100 (or 70) which I’m not planning to do, I’d try to find some replacement metal undercarriage legs for it.
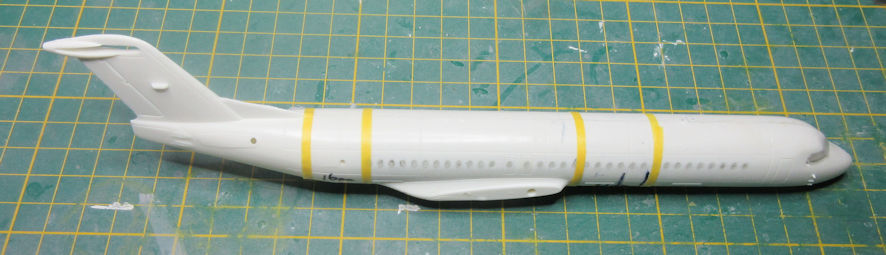
Which brings us to the final stage of applying the decals. Ric Warcup produces some very nice decal sets, often of unusual or neglected types, so they are worth looking at and I have no troubles in using them. In fact, in most cases I would recommend them. On this sheet he offers a full tail decal of blue with the yellow stripe and, in addition, just the separate yellow stripe. I’ve had a lot of trouble with full tail decals that don’t fit properly so I decided to paint the tail blue and then apply the yellow stripe. When I did that, Quelle Horreur!!, the yellow simply disappeared into the blue, leaving it a slightly different shade of green that you wouldn’t notice if you didn’t know to look for it.
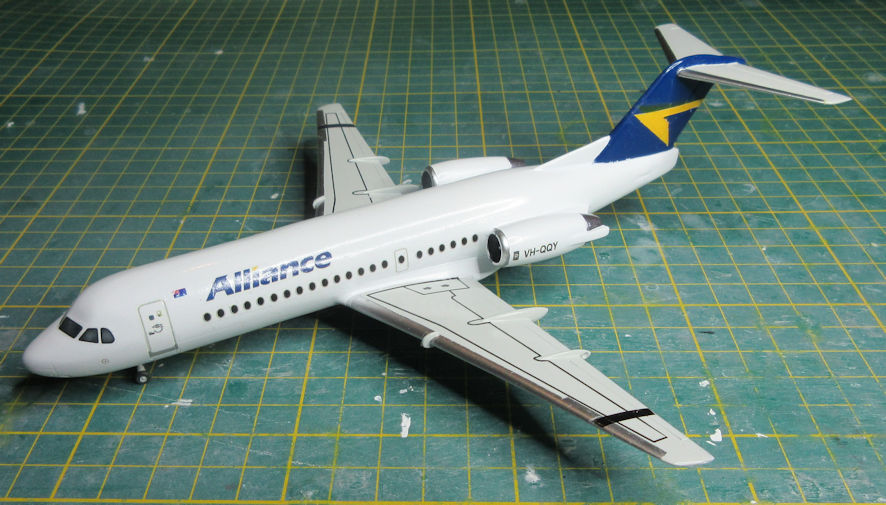
To resolve that problem it was an exercise of masking and airbrushing the yellow strip (thankfully the Alliance logo is simple) and finally the whole nightmare was over. The model actually looks quite nice, which is more than you can say for the process of getting there.
A couple of weeks ago I was chatting to Peter of Hawkeye Models, purveyor of fine decal sets, who tells me that demand from overseas for his Australian decal sets has kept him busy during this COVID inspired stay-at-home. He also tells me that he is almost ready to release sets of decals for various Fokker 100s including, Flight West, Qantas and Alliance. After my experience with the Ric Warcup decals this time I’d advise people to wait for the Hawkeye decal sets when they arrive, which may overcome the tail problem. And if you’re going to make these Revell kits again I’d do a better job with the flap tracks than I did and ,do yourself a serious favour, get some after-market metal undercarriage legs for them. Apart from that, it’s all fun, so they tell me.