(February 2020)
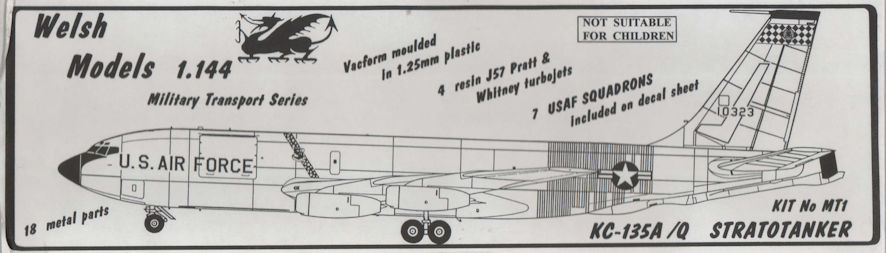
There are several companies that make limited run 1/144 kits, among them is Welsh Models which started off offering very basic vacformed kits of subjects which were desirable because they could not be acquired from anyone else. Over time other kit makers have intruded into this manufacturers domain with some respectable resin and injection moulded kits. To keep up with the times Welsh Models have taken to offering resin kits of a good standard for smaller subjects and kits with some vacformed parts for things like fuselages and the smaller parts in resin. When you buy a Welsh Models kit you could end up with anything from the original purely vacformed kits right through to the full resin or mixed vacformed and resin kits. For a while there Welsh Models also offered a mixed media kit of mainly vacformed parts with a few white metal parts such as engines and undercarriage. The thing you can say about them is that they are better than the full vacformed kits.
There are a couple of things that make Welsh Models kits quite attractive, one is the overall accuracy of the kits which is generally said to be better than most injection moulded kits, and good decal sheets. The instruction sheets assume that the modeller already knows all about this kind of kit so all you get are some general drawings and generalized instructions. These are very acceptable kits if you know what you’re doing, a bit more work than your standard injection moulded kit but offering a very good finished model if one is willing to put in the extra work.
Over the years I’ve built up quite a collection of Welsh Models kits. I’ve made a few over the years and some, such as the Britannia and Deux Pont, were made when all you got was the moulded plasticard sheets and some white metal propellers. These were a real test of my skills and not the kind of thing that I’d want to go through too often. Even so, I’m always tempted when a new Welsh Models kit becomes available with the result that I have a pile of them that I often look at longingly, but often pass them over in favour of something less adventurous in plastic that will be easier to make.
On the other hand, there are occasions when I need something more challenging (read ‘time consuming’) to make, not because I really feel like challenging myself. On this occasion I was off to Canberra for a week of history work and needed something to keep me busy during the evenings after all the fun died down. This is when I go to the Welsh Models kit pile and pick a kit or two to take with me, more or less at random. One of the kits I picked this time was the Welsh Models 1/144 Boeing KC-135A. It turned out to be from the middle period with most of the pieces located on two sheets of formed plasticard and a bag of small metal parts including some engine pods and undercarriage legs and wheels and the refueling boom. This suited me fine, there is nothing better to do in the evening in a strange city than to spend one’s time sanding the tips off ones fingers. The white metal engine pods were a bonus because there a few things worse in the modelling universe than trying to make decent looking engine pods from vacformed parts.
I was going to write here a couple of paragraphs about the process of liberating part that can be used to make a model out of a sheet of plasticard with lumps moulded into them. However, I know some of our readers have delicate constitutions so I will skip over all this mind numbing activity, which is best tackled when one’s mind is already numb from other things. Suffice it to say that after three evening work I had managed to liberate the parts necessary to make a KC-135 from the sheets of plastic Welsh Models had provided. They included fuselage halves with a couple of formers to help them keep their shape, upper and lower wing halves, the same for the rear fins, and a couple of other bits but I never quite figured out what they were for.
Next comes the interesting part of sticking these basic parts together. A lot of weight needed to go in the nose so the finished model wouldn’t be a tail sitter. I usually do this by kneading up some two part epoxy filler and pushing it into one of the fuselage halves along with a lead sinker of two, and pushing the other fuselage half over the top to make sure it is all snug. On this occasion I also moulded a nice little nose undercarriage bay for he nose undercarriage into the filler as it set, which looks pretty effective in 1/144 and saves having to make something small and complex out of tiny bits of plasticard instead. Next is the process of sticking tiny little bits of plastic along the edges of one fuselage side to help the two parts line up and give the thin edges of the plastic a bit of reinforcement. Finally, I bathed the edges of the parts in a good lathering of glue, put the parts together while trying to line them up as much as possible, then wrapped the thing in a lot of masking tape and set it aside to set for a day.
The wings are easier to glue together, in theory, but it is not common for the parts to fit with any great accuracy so I lined everything up as much as possible sloshed the glue around and wrapped them up in tape and also put them aside to set. Only later did I realize that I’d forgotten to cut the holes in the lower wings for the undercarriage bays – I blame this on the one or more drinks and nibbles events associated with history conferences that may have clouded my judgement. This caused problems later on.
After several nights I had fuselage and wings ready to go together. Needless to say, they showed very little interest in anything resembling a snug fit. Using craft wire I made pins that I stuck into the ends of the wings and then drilled holes in the fuselage sides where the wings should go to give the joins some strength. Then followed a lot of very harsh language as I tried to get everything square – or at least looking square. My techniques is to use lots of blue-tac to hold everything firmly on a solid base and then juggle the parts around until they start to look square, and then pour super glue into the gaps in the hope that everything will hold in place while I use plastic shims, various kinds of filler and a lot more harsh language to make the join as solid as possible. After that there was filler, and more filler, and then more filler before the fuselage and wings began to look as though they were closely associated with each other.
When I got home again I gave the model so far made a good examination and decided, by a narrow margin, against throwing it in the bin. Next was the process of fitting the engine pods to the wings, but it turned out that if I had stuck them straight onto the wings as they were the engines would have been pointing down about ten degrees from what they should be – which would not be really accurate. Getting this little problem fixed was the most difficult challenge of the entire project and if you could look at the model now with x-ray vision you’d see all the little reinforcing blocks, metal pins and varieties of glues and fillers underneath the paint on the pylons.
Finally the engine pods and pylons were starting to look reasonable and I thought it was about time to assemble the undercarriage. It was then that I noticed that I had forgotten to prepare the main undercarriage boxes in the wings, and the kit really did go in the bin. Later, on mature reflection, I decided that I had put so much effort into this model that a little thing like that wasn’t going to stop me. It was too late to try cutting out the main gear boxes but I remembered the kits I’d made in my youth that had lacked such boxes and the undercarriage legs were just stuck straight onto the bottom of the wing. Of course, those were Frog kits made in the 1950s, but it’s a precedent, so let’s not quibble ‘Nobody is going to see it if I don’t tell them’, I told myself, and so I cheated. This is not what any self respecting modeller would do, so perhaps I’ve lost all self respect, at least in relation to this model.
The final significant construction challenge was the rear stabilizers, which showed as much inclination to match up to the fuselage as the wings had earlier. The problem was overcome in the same way that the wings had been attached.
Then followed three or four coats of primer, filling, sanding and more priming as all the blemishes in the model were fixed, and then it was time for painting. The instruction and decal sheet offered options for seven different KC-135s, five As and two Qs (the ones that refuelled SR-71s). All the offered versions were painted in the same all over ADC Grey (Air Defence Command) so I ordered a jar of that shade in the AK Real Color range from BNA (along with a new tube of filler). The jar is relatively big but the amount of fluid in it was rather minor and, as it turned out, just enough to give this model two coats, with nothing left over. There was, of corse, all the engine masking to be done for the Tamiya rattle can metallic paints, have I’ve already told you how much I hate masking.
The decal sheet is rather nice and produced by Liveries Unlimited, which is a kind of recommendation. To be on the safe side I gave the sheet a coat of clear varnish to hold the decals together as they were being applied, and that worked most of the time, so there was a minimum of harsh language for this part of the model making process. After some problems with poor decal adhesion a few years ago I’ve taken to applying decals with a wash of fairly lightly diluted Selly’s Aquadhere but this time I didn’t bother because the plan was to give the model a couple of coats of clear varnish to seal the decals in. However, almost before I’d finished some of the decals started lifting off because the adhesion was so poor so I had to go back and reattach most of them with the glue wash to get them to stick again. That’s something I won’t not be doing again.
Finally, a few bits had to be painted black and then, when everything had dried, on went a couple of coats of Tamiya semi-gloss rattle can lacquer. Then came time for the undercarriage wheels which are white metal. The problem with them is that where there should be holes for the undercarriage legs to go into, there aren’t any, a moulding problem I assume where bubbles got into the holes. It turns out that I’m not very good at drilling holes in white metal in the precise centers of tiny wheels, which makes the resulting completed undercarriage look a bit wonky. But since the entire undercarriage is something of a disaster, it’s just as well that nobody is going to see much of it.
Despite everything, this turned out to be a nice little model, if you don’t look at it very hard. Now I feel the need to make a B-52 to go with it, but I don’t think Welsh Models makes one of those.