(April 2004)
In the aftermath of World War II armed forces, aircraft manufacturers and designers tried all kinds of odd things to find the best way to make high performance jet powered aircraft. One idea that circulated in the US Navy was that it would be impossible for supersonic jet aircraft to operate from the decks of aircraft carriers and so if the Navy wanted to have supersonic fighters it would have to find some other way of using them. Hence the idea of a supersonic seaplane. There would be another advantage in having this kind of aeroplane, it would be able to operate almost anywhere that there was a fair stretch of relatively clam water.
Convair entered the seaplane fighter contest on 1 October 1948 and it was awarded the contract in January 1951. The design followed on from their XF-92 delta winged fighter that led also to their F-102 and F-106, the major difference with the F2Y was that it had two lower powered engines mounted on top of the fuselage and a boat shaped bottom surface. The Navy were very enthusiastic about their new fighter and twenty-two were ordered before the prototype had even flown. As it turned out, the engine that had been selected for the F2Y was not ready by the time the prototype was under construction so less powerful engines were substituted so the XF2Y had no hope of breaking the sound barrier but it still allowed the concept to be tested. The most severe problem was the twin hydro-skis that retracted into the hull in flight but made the aircraft almost uncontrollable during take-off and landing. Some improvements were made but this still remained a serious problem. The other problem was that the F2Y had been designed before the discovery of transonic drag so while the F-102 and F-106 could be redesigned to accommodate it the F2Y could not. This meant that when the first YF2Y with the planned engines flew it was only able to exceed the speed of sound in a slight dive.
The Navy lost interest in the supersonic seaplane idea as it became clear that supersonic aircraft could operate from carriers and as the problems with the F2Y continued. Some of the order was cancelled in December 1953 and the rest in March 1954. Only five F2Ys were built, one XF2Y-1 and four YF2Y-1s, though only two of them flew. One of the YF2Ys broke apart in the air while demonstrating for an audience of officers and members of the press in November 1954, which did not help promote this aircraft but they continued flying for some time with the second YF2Y flying for the first time on 21 December 1954. Testing concluded on 28 April 1955 when that YF2Y made its final flight and all four remaining F2Ys are now in museums.
The F2Y Sea Dart has been on my list of most favourite aeroplanes since I first saw a picture of one sometime in the late 1950s. They must have been exciting aeroplanes to watch landing and taking off with water going all over the place in addition to all the noise of a couple of early jet engines going flat out. However, for decades nobody obliged me by offering a kit of this obscure aeroplane, not that I could find at any rate. Later a couple of vacform kits became available, one from Airmodel which, as with most of their offerings, is really only the bare bones of a kit, and a later one from Execuform which was considerably better, which is still not much of a recommendation. I bought both of them but never had the nerve to start work on them. Then, out of the blue I found that the French company, Mach 2, which I had known only for their kits of French subjects, also made a YF2Y and it didn’t take me too long to get one.
Looking upon the contents of a Mach 2 kit can be something of a disheartening business. What you get for your small fortune is a large single sprue, a little transparency, decals of dubious value and an instruction sheet that must have been drawn by somebody who had studied art at kindergarten. Most daunting is the large sprue that offers an assortment of lumps of plastic that offer the potential of being turned into a scale model aeroplane. If you haven’t had much experience with making models out of these kinds of kits you might well through up your hands in horror and get out another Tamiya kit, but if you really want to have a F2Y model and you are used to these kinds of limited run kits the task ahead might be a bit longer than with one of the high quality kits, but it is far from impossible. A couple of examples demonstrates the point. If you just plug the tabs of the wings into the sides of the fuselage you will have a model of something that could never have flown because nothing lines up properly, but two or three minutes of test fitting with a knife at hand to trim the pieces soon ends up with everything fitting nice and squarely. I had a lot of doubts that the canopy could ever be attached to the fuselage in any acceptable way but after looking at the pieces for a few minutes and then spending a little bit of time trimming, testing, trimming and testing again, the canopy almost fell into place. The twin jet exhausts are rudimentary, to put it mildly, but twenty minutes of work with some epoxy putty solved that problem.
The major problem is the instruction sheet which just gives only very general indications of where the pieces go. With some of the moulding being so rough it is not clear which parts they are supposed to be anyhow, so finding some good reference sources is handy. I had almost nothing of any value on hand but a cruise around the internet found a few bits and pieces that were helpful. Peering at what photos are available – not many – is also useful. This is particularly the case since the XF2Y and the two YF2Ys to fly each tested various configurations so that it took me a while to figure out that what Mach 2 offered could only be the second YF2Y because of the configuration of the beaching wheels, and that in turn gave me an idea of what they should look like so I could carve the pieces into something vaguely right.
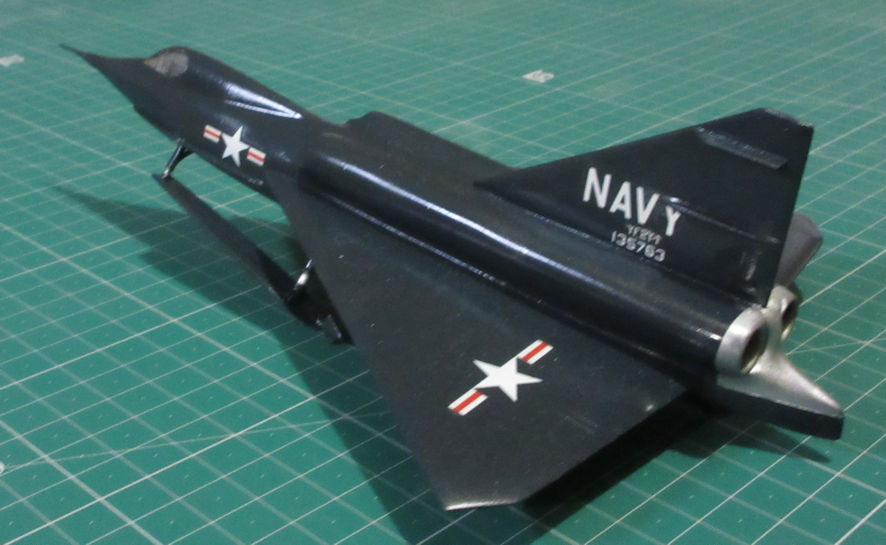
After all that excitement the painting could not be easier. A couple of coats of all over gloss dark sea blue with a bit of bare metal around the exhausts and some silver on the hydro-ski struts. The decals are really only good for the bin. The serial numbers has to be replaced because, even though the box top art (that doubles as the painting instructions) shows the correct six digit number the decals leaves out one of the numbers. However, some Microscale decals I picked up years ago which supplies nothing but numbers solved that problem. And, the end result? After the additional work that had gone into it, the occasional bits of improvisation and the like, the end result is almost as lovely as I had imagined it should be.