(May 2000)
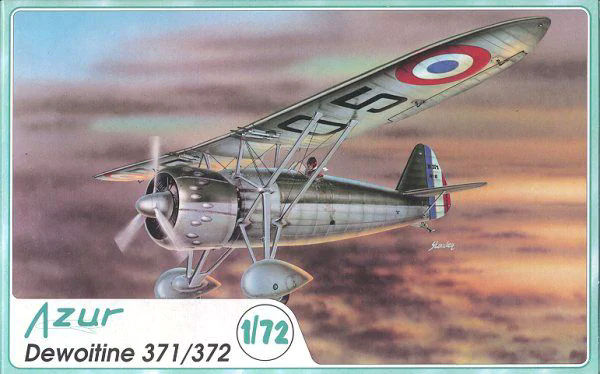
Dewoitine is one of the best known names in French aviation, mainly because of the Dewoitine D.520 fighter, the ‘French Spitfire’, that served with distinction in the short Battle of France in mid 1940. Emile Dewoitine began constructing aeroplanes in 1923 and produced several good designs in the 1920s. Work began on the D.37 series around 1930 and the parasol wing prototype first flew in 1934. Twenty-eight D.371s were ordered by the Armée de l’Air in 1935 and 14 D.372s (export version of the D.371) were ordered for the Lithuanian Air Force. Later a total of 44 D.373s and D.376s were delivered (the latter version had folding wings and two squadrons were in service with the Aéronautique Navale in 1940). At the outbreak of the Spanish Civil War the 14 Lithuanian D.372s and 10 French D.371s went to Spain where they served successfully with Republican forces until more advanced aeroplanes joined the Nationalist forces and they were replaced by Russian Polikarpov fighters.
Where would we be without Azur? In the past couple of years they have produced a series of excellent limited-run kits of French aeroplanes. Each one has been excellent value with finely crafted parts, a small fret of brass parts, a vacformed windscreen and an excellent decal sheet. Long may the continue producing kits like this successfully.
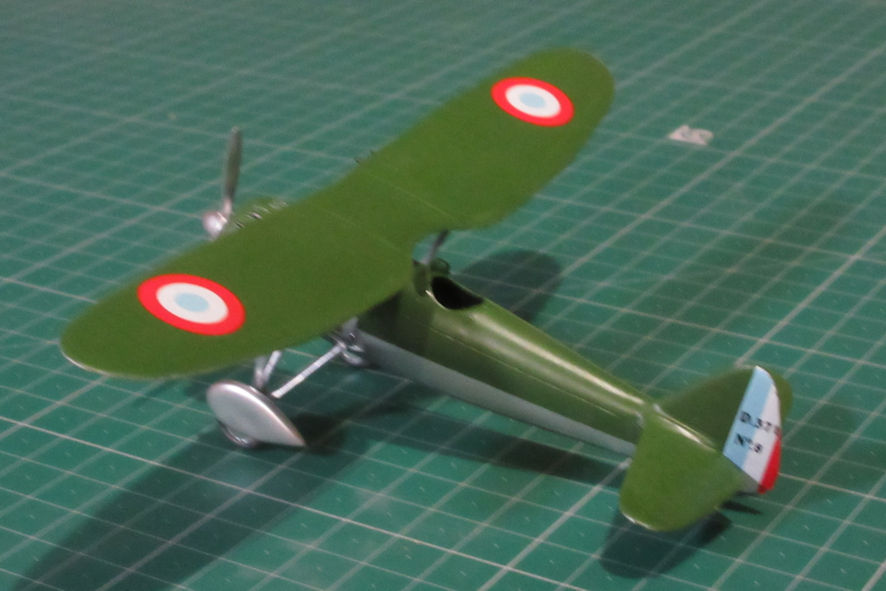
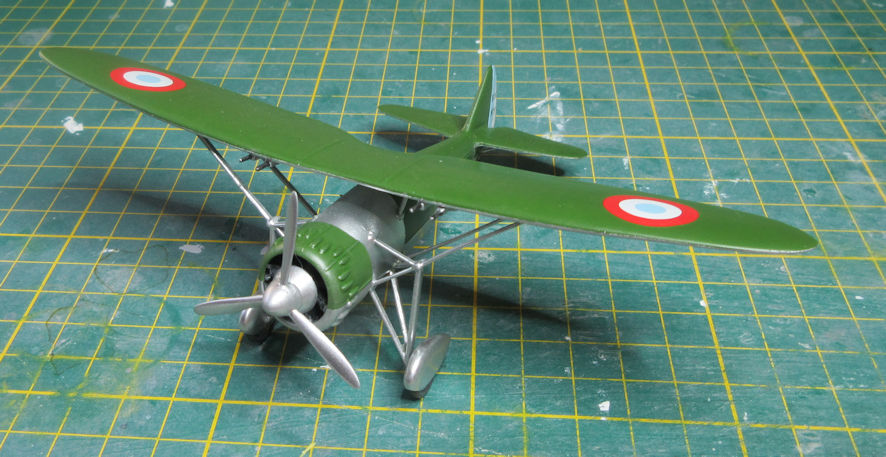
The D.371 is a petite model with very fragile parts. It is a typical limited run kit which asked the modeller to make their contribution in completing a good end result, unlike some of the latest injection moulded kits that almost make themselves. Construction is actually very straight forward and falls into three parts.
First is the engine which comprises a beautifully detailed crankcase, individual cylinders and a delightful engine cowling, all very well detailed in resin. The instruction sheet tells you to make a large number of individual exhaust pipes to be attached to the rear of the engine, it’s not as difficult as it looks but they aren’t entirely necessary to a nice looking little model. When you’ve finished constructing the engine in its cowling put it aside, joining it to the fuselage is the last step in the project.
Next comes the fuselage which is very standard with a nicely detailed little cockpit. You need to make your own tail struts as they don’t come with the kit, the instructions tell you how.
The wings are very simple, a one piece wing that needs a touch of cleaning up and the machine guns. This can be a little confusing since the instructions tell you that for the D.371 you have to add stretched sprue to the wings for the guns or use the supplied guns for the D.372. My research suggests that it is probably the other way around – the box shows a D.371 with machine guns as supplied in the kit which clinched the matter for me.
With the engine, fuselage and wings ready you come to the most daunting part of the project, putting them together. The struts supplied with the kit are extremely thin and fragile and it took me a long while to work up the courage to tackle them. The key to success in using the struts successfully is to use a solid, precise jig that holds the wing and fuselage exactly where they need to be and then fitting the struts into place using drops of liquid glue. I found it easiest to do this with the model upside down with the wing facing up and the fuselage perched above it, starting with the inner struts and working out. Work with a pair of fine tweezers and a great deal of patience, when everything is done go away and shake for a while. A day later I continued and put the undercarriage on, once again using little dobs of liquid glue. Liquid glue is preferable to SuperGlue because it gives you time to move the struts into exactly the right place and welds the parts together – making me feel a bit more confident about the strength of butt joins than I would with super glue which has little shear strength. When you come back a couple of days later and take the model out of its jig the end result is a lot stronger than you’d expected. That doesn’t stop the individual struts from breaking and a couple did as I completed the model, but the other struts held and another little DOB of liquid glue took care of the problem.
The kit offers options to make either a D.371 or a D.372 with alternate tail planes, spatted or unpathed wheels and the option of machine guns. The kit also offers five colour options, one French, two Spanish and two Lithuanian. The simplest would be an all-silver Lithuanian version and the most complex one of the Spanish versions. I wouldn’t want to tackle the Spanish one with the wing attached to the fuselage, perhaps others are bolder than me. The French version is fairly simple to complete and that’s what I chose (what else?). The top colour green is best represented by Humbrol 80 (so I’m told by people who should know – the French Aviation Modelling web site) and I used Humbrol 11 silver for the rest. I only found out that the decals for the rudder stripes were too big for the rudder on the model when it was too late, and rudder stripes really can’t be swapped around because that’s where the French put the aircraft numbers.
Would I recommend this kit? You bet! But its not for the faint hearted or the inexperienced and getting this model finished successfully was quite a challenge. But what a lovely little aeroplane and what a lovely little kit!
 Where would we be without Azur? In the past couple of years they have produced a series of excellent limited-run kits of French aeroplanes. Each one has been excellent value with finely crafted parts, a small fret of brass parts, a vacformed windscreen and an excellent decal sheet. Long may the continue producing kits like this successfully.
The D.371 is a petite model with very fragile parts. It is a typical limited run kit which asked the modeller to make their contribution in completing a good end result, unlike some of the latest injection moulded kits that almost make themselves. Construction is actually very straight forward and falls into three parts.
First is the engine which comprises a beautifully detailed crankcase, individual cylinders and a delightful engine cowling, all very well detailed in resin. The instruction sheet tells you to make a large number of individual exhaust pipes to be attached to the rear of the engine, it’s not as difficult as it looks but they aren’t entirely necessary to a nice looking little model. When you’ve finished constructing the engine in its cowling put it aside, joining it to the fuselage is the last step in the project.
Next comes the fuselage which is very standard with a nicely detailed little cockpit. You need to make your own tail struts as they don’t come with the kit, the instructions tell you how.
The wings are very simple, a one piece wing that needs a touch of cleaning up and the machine guns. This can be a little confusing since the instructions tell you that for the D.371 you have to add stretched sprue to the wings for the guns or use the supplied guns for the D.372. My research suggests that it is probably the other way around – the box shows a D.371 with machine guns as supplied in the kit which clinched the matter for me.
With the engine, fuselage and wings ready you come to the most daunting part of the project, putting them together. The struts supplied with the kit are extremely thin and fragile and it took me a long while to work up the courage to tackle them. The key to success in using the struts successfully is to use a solid, precise jig that holds the wing and fuselage exactly where they need to be and then fitting the struts into place using drops of liquid glue. I found it easiest to do this with the model upside down with the wing facing up and the fuselage perched above it, starting with the inner struts and working out. Work with a pair of fine tweezers and a great deal of patience, when everything is done go away and shake for a while. A day later I continued and put the undercarriage on, once again using little dobs of liquid glue. Liquid glue is preferable to SuperGlue because it gives you time to move the struts into exactly the right place and welds the parts together – making me feel a bit more confident about the strength of butt joins than I would with super glue which has little shear strength. When you come back a couple of days later and take the model out of its jig the end result is a lot stronger than you’d expected. That doesn’t stop the individual struts from breaking and a couple did as I completed the model, but the other struts held and another little DOB of liquid glue took care of the problem.
Where would we be without Azur? In the past couple of years they have produced a series of excellent limited-run kits of French aeroplanes. Each one has been excellent value with finely crafted parts, a small fret of brass parts, a vacformed windscreen and an excellent decal sheet. Long may the continue producing kits like this successfully.
The D.371 is a petite model with very fragile parts. It is a typical limited run kit which asked the modeller to make their contribution in completing a good end result, unlike some of the latest injection moulded kits that almost make themselves. Construction is actually very straight forward and falls into three parts.
First is the engine which comprises a beautifully detailed crankcase, individual cylinders and a delightful engine cowling, all very well detailed in resin. The instruction sheet tells you to make a large number of individual exhaust pipes to be attached to the rear of the engine, it’s not as difficult as it looks but they aren’t entirely necessary to a nice looking little model. When you’ve finished constructing the engine in its cowling put it aside, joining it to the fuselage is the last step in the project.
Next comes the fuselage which is very standard with a nicely detailed little cockpit. You need to make your own tail struts as they don’t come with the kit, the instructions tell you how.
The wings are very simple, a one piece wing that needs a touch of cleaning up and the machine guns. This can be a little confusing since the instructions tell you that for the D.371 you have to add stretched sprue to the wings for the guns or use the supplied guns for the D.372. My research suggests that it is probably the other way around – the box shows a D.371 with machine guns as supplied in the kit which clinched the matter for me.
With the engine, fuselage and wings ready you come to the most daunting part of the project, putting them together. The struts supplied with the kit are extremely thin and fragile and it took me a long while to work up the courage to tackle them. The key to success in using the struts successfully is to use a solid, precise jig that holds the wing and fuselage exactly where they need to be and then fitting the struts into place using drops of liquid glue. I found it easiest to do this with the model upside down with the wing facing up and the fuselage perched above it, starting with the inner struts and working out. Work with a pair of fine tweezers and a great deal of patience, when everything is done go away and shake for a while. A day later I continued and put the undercarriage on, once again using little dobs of liquid glue. Liquid glue is preferable to SuperGlue because it gives you time to move the struts into exactly the right place and welds the parts together – making me feel a bit more confident about the strength of butt joins than I would with super glue which has little shear strength. When you come back a couple of days later and take the model out of its jig the end result is a lot stronger than you’d expected. That doesn’t stop the individual struts from breaking and a couple did as I completed the model, but the other struts held and another little DOB of liquid glue took care of the problem.