(August 2006)
By the mid 1930s the development of fast medium-range airliners had settled on the twin engine, all metal monoplane format. The requirements of different national airlines led to slight variations but for an airline like Air France with a network of routes across Europe, the requirement was similar to a requirement in the United States for an airliner capable of flying from coast-to coast. In the United States the requirement was met by several airliners including the Douglas DC-2 with a seating capacity of 14 passengers, a speed of 338km/hr and a range of 1609 km. In France the Bloch 220 fitted the same role with a slightly higher seating capacity, similar speed and greater range. The major difference between the two was that 193 DC-2s were manufactured and it led to the DC-3, while only 17 Bloch 220s were produced. This doesn’t mean the French airliner was a failure; in the 1930s it was fairly common for airliners produced for national carriers to be manufactured in the very small numbers that were required when a passenger fare could equal months of an average person’s pay.
The prototype Bloch 220 first flew in December 1935 and by mid 1938 ten had been produced. They were fully used on Air France’s European routes and when the first Bloch 220 service was flown between Paris and London on 27 March 1938 it reduced the flight time to 1 hour and 15 minutes. During World War II most Bloch 220s were pressed into military service, initially with the Armee de l’Air’s military transport units. Later they were flown in German, Free French and Vichy French colours in Europe, North Africa and the middle-east.
At least five Bloch 220s survived the war and were modified to Bloch 221s with Wright Cyclone R-1820 engines. They returned to Air France’s European network, this time flying the shorter routes, but they had all been withdrawn from service by about 1950.

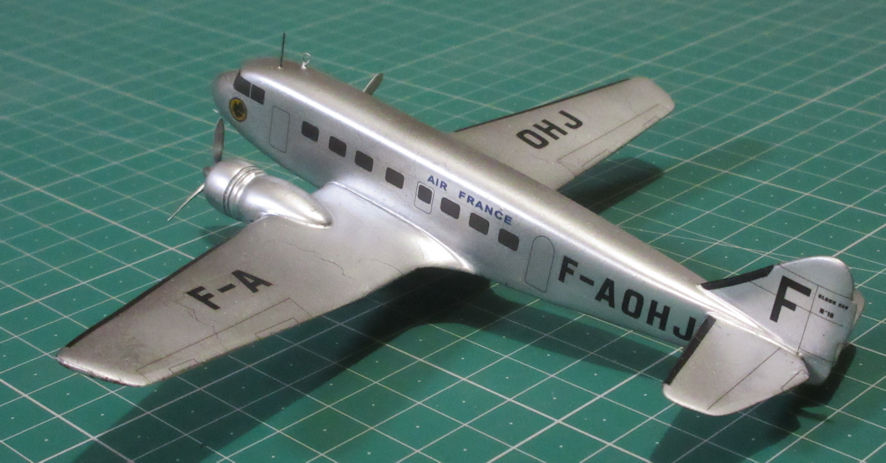
I discovered this little French kit maker over the internet by trying to track down a kit on eBay. It, or rather he, has a range of only a dozen or so kits, all airliners and all in 1/144. They come in little brown boxes with no instructions to speak of but a very nicely presented side view drawing of the colours and an exceptionally nice decal sheet. With this kit, but not with others, is a fairly basic three-view drawing that is invaluable. The resin parts, of which there are few, are very nicely finished. There is, of course, the business of liberating the kit parts from the large resin plugs but I’m beginning to enjoy working with resin which usually has a very nice texture. I bought several of these kits in one batch and they all possess the same general characteristics, so I expect that the entire range is the same and I will be helping myself to some more in the future. These resin kits are not cheap because they are more or less hand made. That characteristic is emphasised in the Block 220 kit by the hand formed and soldered brass undercarriage parts that are excellent and fit beautifully.
The kit itself comprises six basic parts; a fuselage, a wing, two elevators and two engine nacelles. The fit is, to use a post modern phrase, nuanced. It means that there is a lot of leeway for getting things wrong, with even these few parts. There is no indication where the elevators of the engine nacelles should go. That’s what the three-view drawing is for and that is what makes this kit a little more enjoyable to make, because it’s up to you to get it right. The wing slips into a big hole in the bottom of the fuselage and, here again, it is up to you to get it right when you join them because there is a lot of leeway for getting it wrong. (As an aside here, the only direction in which the wing position is not flexible is fore and aft and I have the feeling that that might have been useful because, looking at pictures of Bloch 220s, I get the feeling that there should be more of the fuselage forward of the wing than there is in this kit. But since I have no plans I can rely on I can’t be sure of this so I left things the way they were.)
After you’ve attached the fuselage to the wings and then the engine nacelles, you go out and buy a tube of filler. That’s a little bit of hyperbole, but this kit needs some serious filling because the gaps are large. It’s better to do the filling in stages rather than trying to achieve it all at once, but when the gaps have been filled and other little details taken care of, it is time for the most important part of 1/144 airliner kits. Usually I leave things like the undercarriage and aerials off until after the painting, but in this case I thought it was better to attach them and get everything a similar shade, which meant careful handling so they didn’t get knocked off.
This is where things started to come unstuck. I’ve been experimenting with Alclad II Polished Aluminium and not doing too well so far. The problem is that the instructions say you have to put down a coat of gloss black enamel and then the coat of Polished Aluminium laquer over it, and I bought myself a tin of the Alclad II gloss black just to be on the safe side. Getting the gloss to go on well depends on having a good primer coat because any imperfections of the primer leads to imperfections in the gloss black that leads in turn to flaws in the Polished Aluminium coat. Eventually I got on top of that problem but the gloss black seemed to take ages to dry so I left it for a couple of days, and even then it didn’t feel as though the paint had properly set. Still, the instructions seem to suggest that a slight tackiness might be good for the final coat so on when the Polished Aluminium and it did look very nice.
The decals went on nicely and settled down well but, as I began applying them the lovely polished finish began to craze and ripple where I held the model. It appeared as though the black undercoat was nor properly set. It doesn’t look good on the top, and even worse underneath, but overall the little airliner looks very nice. Chalk this one up to experience.