(July 2014)
Before we go any further you need to decide that you really want to do this. It=s not that the conversion is particularly difficult, it=s because you will have to acquire two kits to do the job, a Revell Boeing 747-100 and a Revell Boeing 747-400. Neither are available in your local hobby shop at the moment so you=ll need to go eBay or something like it to find them and, while I bought mine several years ago when they were nice and cheap, these kits seem to have gone up a lot in price of late, it you can find the 747-100 at all.
Apart from that, the 747-300 is really only a short lived stepping stone between the classic 747-100/200 and the modern 747-400. From the outside the 747-100 and the 747-200 are identical apart from the number of windows on the upper deck, three for the -100 and ten for the -200 (in most cases, there are always exceptions and early -200s only had three windows too.) The 747-300 is similar in appearance to the -100/-200 except that most of them had the Extended Upper Deck that became standard on the -400. But while the -400 had a new wing the -300 had the old wing of the -200. Consequently, the quickest way to make a 747-300 is to graft the extended upper deck of a -400 kit onto the upper fuselage of a -100 kit. Hence, the need for the two kits.
(You could probably do this other ways including either moulding the upper deck in resin or crash moulding it, but you=d really need to use a -400 kit to make the master to make the mould. So it may come down to the same thing, except that you don=t need to do the butchery that my process did.)
So, why make a 747-300? The first reason is, why not? We all like a challenge from time to time and, on the scale of life challenges ranging from washing the dishes to scaling Mt Everest, this challenge is not a big one, close to the dish washing end of the scale. The other reason for making one is to plug a gap in my collection. I don=t know what your excuse might be.
So, having decided to make a 747-300 the next question is, which airline colours should it bear. For me the answer is fairly straight forward. Back in the good old days there was an airline called Ansett Airways that used to fly in competition with another airline called Trans Australia Airlines. That=s all gone now. TAA was absorbed into Qantas so it could be sold off to capitalists and Ansett disappeared one day without warning, leaving only memories and debts, the wreckage of capitalism in action. For a period there Ansett had dreams of becoming an international airline and leased a couple of 747s from Singapore Airways (due to some kind of complex financial arrangement between Air New Zealand (which owned Ansett, explain that one), Ansett and Singapore.) Initially the leased 747s were old Singapore Airways -300s but later they were -400s. So if you wanted to depict an Ansett 747 you could make a standard Revell 747-400 out of the box and paint it all over white and apply Ansett decals, but since Qantas also flew -400s but never flew -300s, making an Ansett 747-300 gives the opportunity to show the two different liveries in two different versions of the 747. Logical, eh?


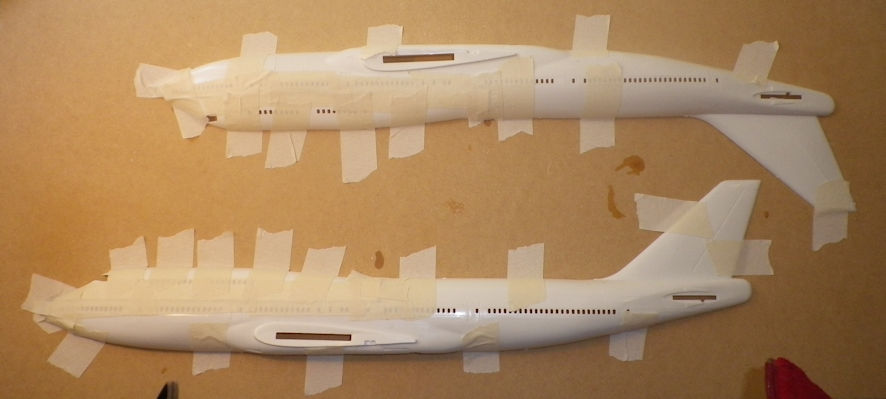
The only difficult part of the entire process is cutting the upper fuselages in which the upper decks are different from the rest of the fuselage of both kits so that when you stick the extended upper deck from the -400 to the fuselage of the -200 it fits properly. Cutting is not really difficult, measuring so the cuts are in the right part on both kits is more challenging.
To ensure that the vertical cuts were in the same place I drew the outline of the -400 onto a large piece of paper, marked where that cut should go on the outline and then placed the -200 fuselage on that outline (they are close to being identical) and marking the position of the cut onto that fuselage half.
Finding out where to make the vertical cut looked to be much more difficult until I figures out that the window line on the -200 is half a millimeter lower on the fuselage than they are on the -400. That made it easy. After that all you have to to is make the cut. If I=d had any brains I would have used a razor saw and the cuts would have been nice, straight and clean. Strangely, I decided to use my good old craft knife so the cuts are ugly and uneven. This, however, was not a serious problem, except to my tidy mind.
The only other little difficult part is to stick a bit of backing plasticard to the inside of the fuselage sections so when you come to glue the upper deck parts to the rest of the fuselage there is a nice positive join and the filler you apply doesn=t just disappear into the cavernous fuselage.

By the way. After you=ve done all this the rest of the 747-400 kit isn=t wasted. Put the left over upper deck parts in with it and save it up until the day you feel inclined to making a 747-400 freighter model. Since they were freighters they didn=t have the extended upper deck.
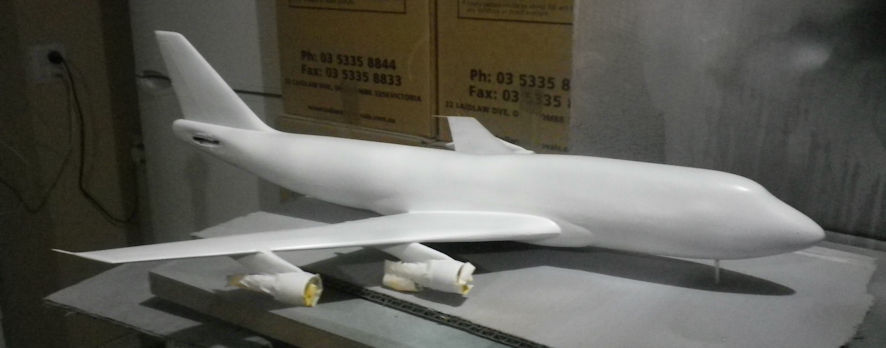
After that it=s all straight forward. Follow the kit instructions, for what that=s worth, and have a look at lots of pictures of Ansett Australia 747-300 on Airliners.com. You also need a set of Ansett Australia decals from Hawkeye. That=s it. What are you waiting for.

